|
To borrow a title from a former chancellor of our alma mater; in this post we'll provide a paraphrased history of the project from inception to the present day. Intro and early days Getting straight into it - the idea for the project came from a conversation between Tom M & Tom A at a friends' wedding in 2014 - thanks Andy and Michelle!
 The first 'bat drone' During the project we've been very fortunate to be invited to the Natural History Museum to give a talk and have a stand at a couple of events. One of the questions that comes up most often is "what company or university are you at?" We're not. The project is simply a very enjoyable hobby. We want to help further bat conservation it's a great way that we can assist with this using our respective skills. Tom A is our bat expert (and is now a qualified and competent drone pilot) and Tom M is our drone designer, builder and operator. We think this goes to show that if people are willing, you don't need the support of a big research grant or institution to push boundaries. Our advice is to "give it a go and see where it takes you".
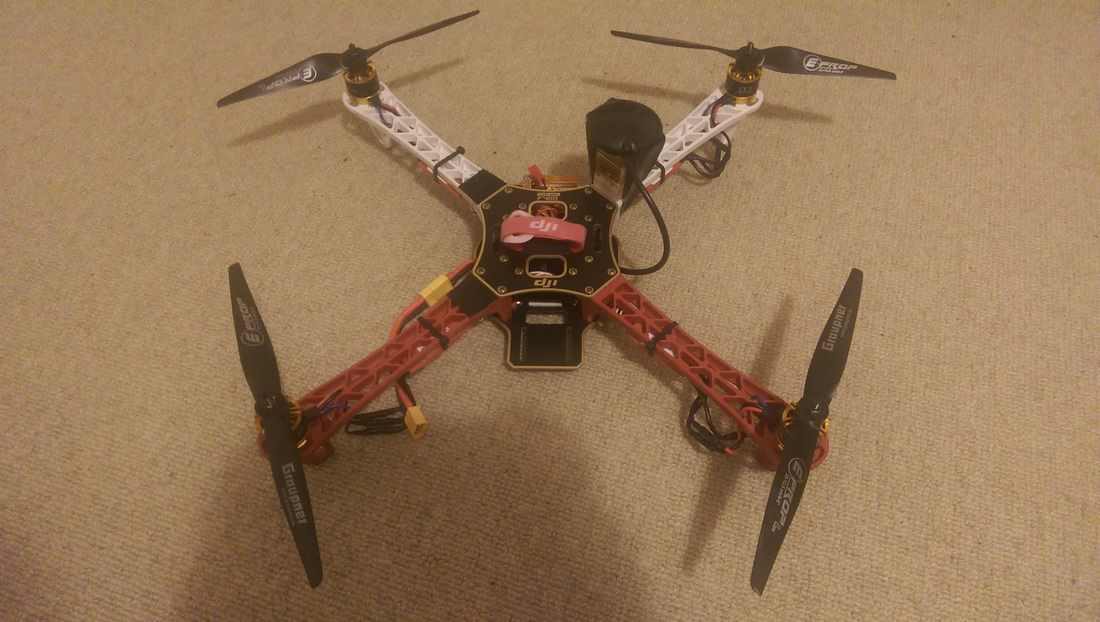
We knew that quadcopters produced a lot of sound but didn't know how much of this was ultrasound. Our first tests showed us that it was a considerable amount. This ultrasonic interference has been a running theme through the project. The problem lies in the signal to noise ratio of the bat call. If there is too much noise from the drone we won't be able to 'hear' the bat call. This meant that we had to separate the drone and the detector recording the bat calls by about five meters. The highly technical application of a piece of string was employed though this wasn't without it's problems as you can see in the video below. The problem of the oscillation arose due to the high weight of the detector. We were glad we used a water bottle of the same weight as the detector in testing! The detector and recorder weighed about a third of the quadcopter mass. This led to loss of control and meant and it wasn't an option in this configuration.
In going back to the drawing board we wanted something that produced less noise and could comfortably fly with the payload of the detector. The obvious choice for us was to move to a plane; it had the added bonus of being able to fly for longer too (about 8 mins for the quad and 25 for the plane).
0 Comments
After our initial field testing with the first bat plane (have a look at the blog post here) we knew that we needed to reduce the noise seen in the sonograms. This has been the driving force behind making the Mk2, Mk3 and purchasing the Talon. The noise is a product of the propeller spinning and as such we've tried to reduce the noise heard by the ultrasound detector by separating the propeller and detector by as much distance as possible. For the Talon we tested both the Peersonic and Soundtrap (which has changed name to Open Acoustic Devices due to a conflict of names - the actual detector is called the AudioMoth) detectors in a variety of positions to compare noise levels. The positions were:
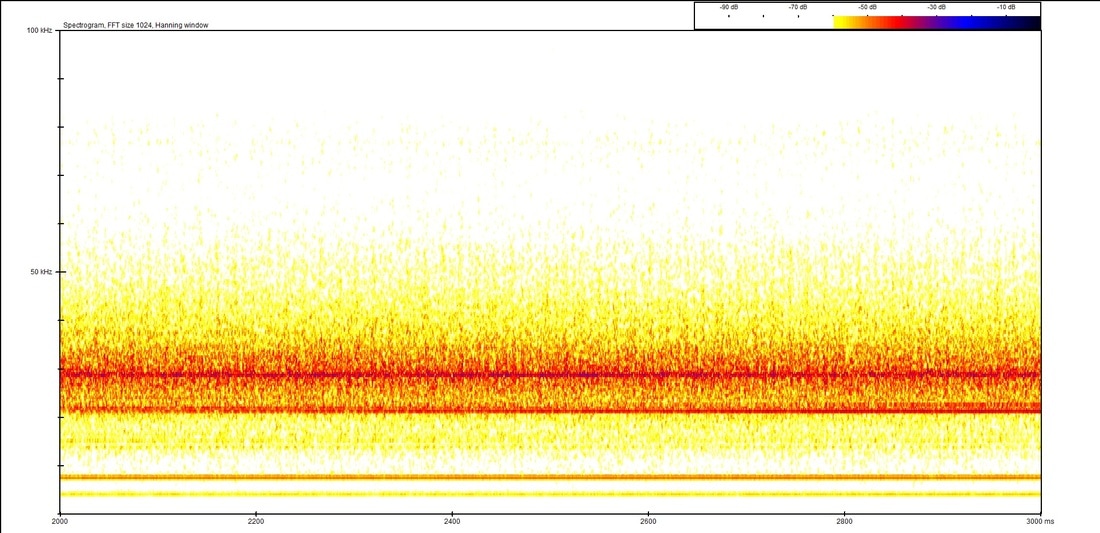
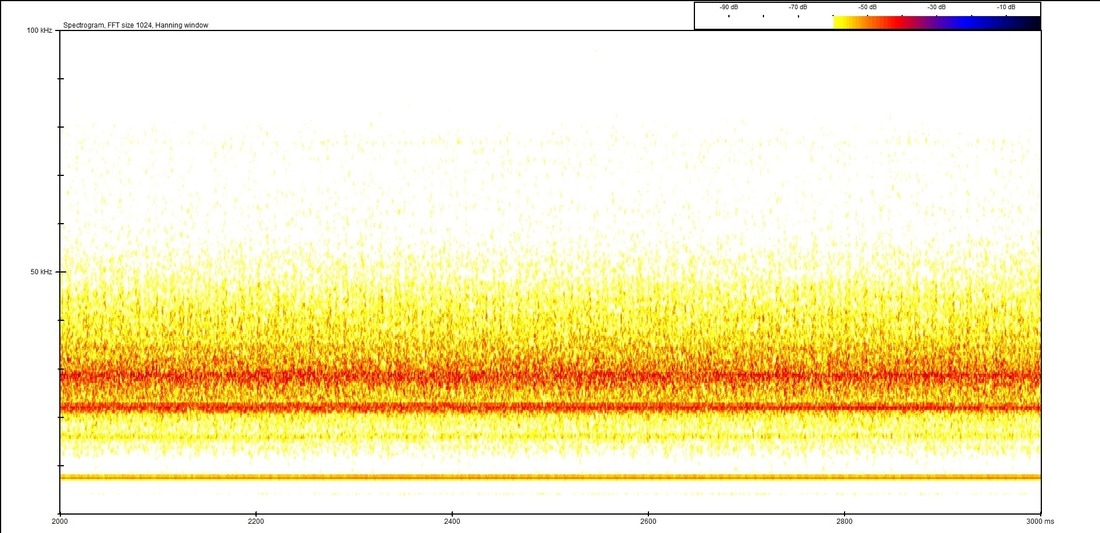
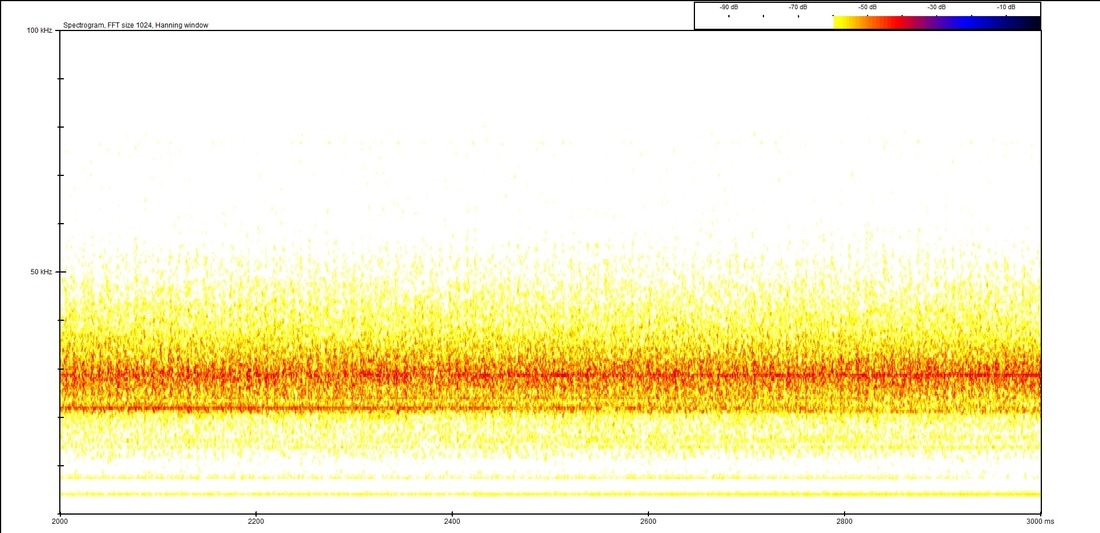
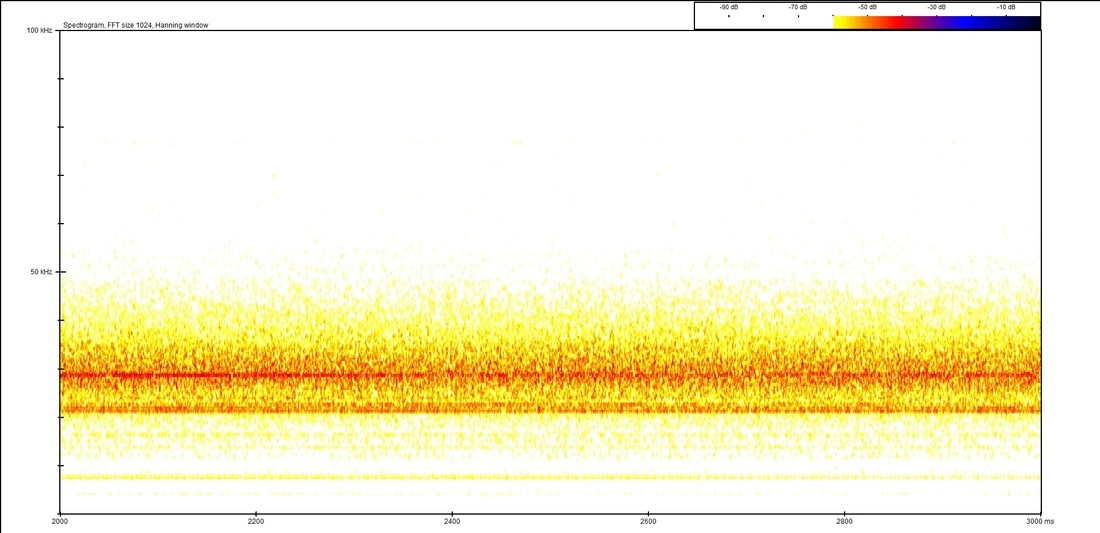
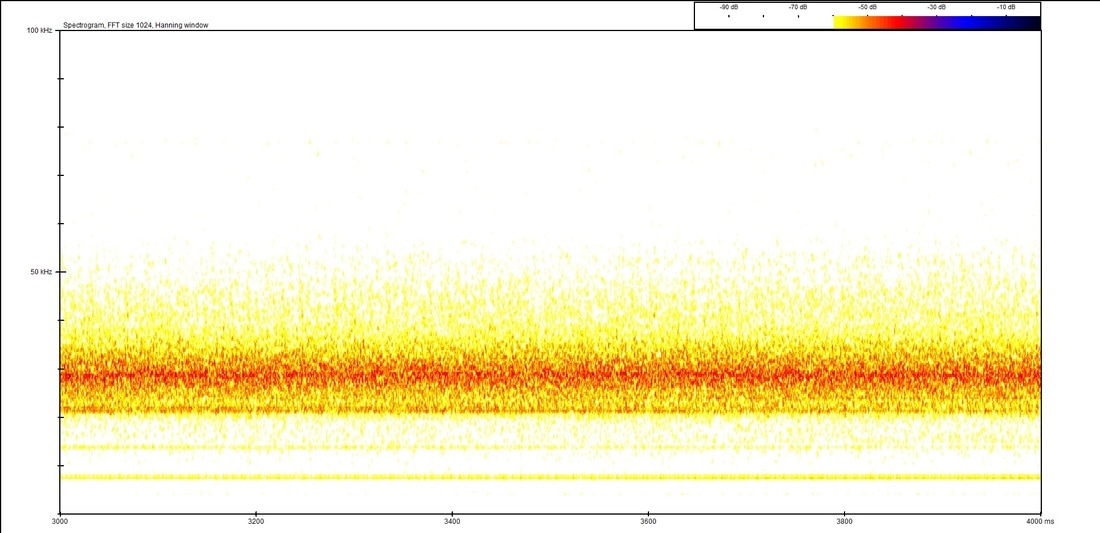
* This would be achieved by attaching an extension to the front of the plane. For fun we've called this the Nimrod option. It'll look something like the re-fueling pipe extending from the front of the plane:  Let's take a look at the data we produced from the two detectors in the various positions. For reference, the throttle was set at the minimum value required for level flight (circa 35%) in order to minimise noise which mimics what we would do in field testing. Here are the sonograms:
The first noticable difference between the two detectors is that the Soundtrap picks up a lot more noise. There are a number of possible reasons for this. One we know will be a factor is that the Peersonic has a microphone which actively suppresses noise below 20kHz.
Looking at the difference between the various positions, it's apparent that the noisiest position is under the belly (also closest to the propeller) and the quietest is 5cm from the nose. The quietest is somewhat of a surprise, we expected the 15cm from the nose position to be quieter as it is further from the propeller. Perhaps this is due to the airframe blocking the sound at the 5cm position. In conclusion, the current thinking is to use the 5cm position for field testing. As there is still some time before the bats come out of hibernation we think it might be worth testing a further extended-Nimrod option, with the microphone circa 60cm from the nose and we'd also like to compare the signal to noise ratio for the Peersonic and Soundtrap (AudioMoth) in the preferred position using the ultrasound source (see the blog post here about using this previously). Keep checking out the blog for more! UPDATE: Soundtrap has now changed name (due to a conflict of names) to Open Acoustic Devices. The detector we're using is now called the AudioMoth. For this blog post we'll keep the references as 'Soundtrap' as it was at the time. Here's the original post: A short time ago we were contacted by a small group of academics who have designed and produced a small ultrasound detector. The detector is called a Soundtrap and their detector is designed as a low-cost open-source acoustic logger for biodiversity and environmental monitoring. For more information on Soundtrap, please visit their website: http://soundtrap.io/ The group is made up of researchers at the University of Oxford and University of Southampton and they have been kind enough to send us one of their detectors to do some testing with. The detector has already been deployed for a number of experiments around the world and if you're interested in it then we'd highly recommend checking out their website. One of the major benefits of this detector is the size - it's tiny! This is a big help as the less weight we carry when flying the better; although, when using a detector on the boat this is less important. Have a look at the photo below to see just how small it is next to a normal size business card: 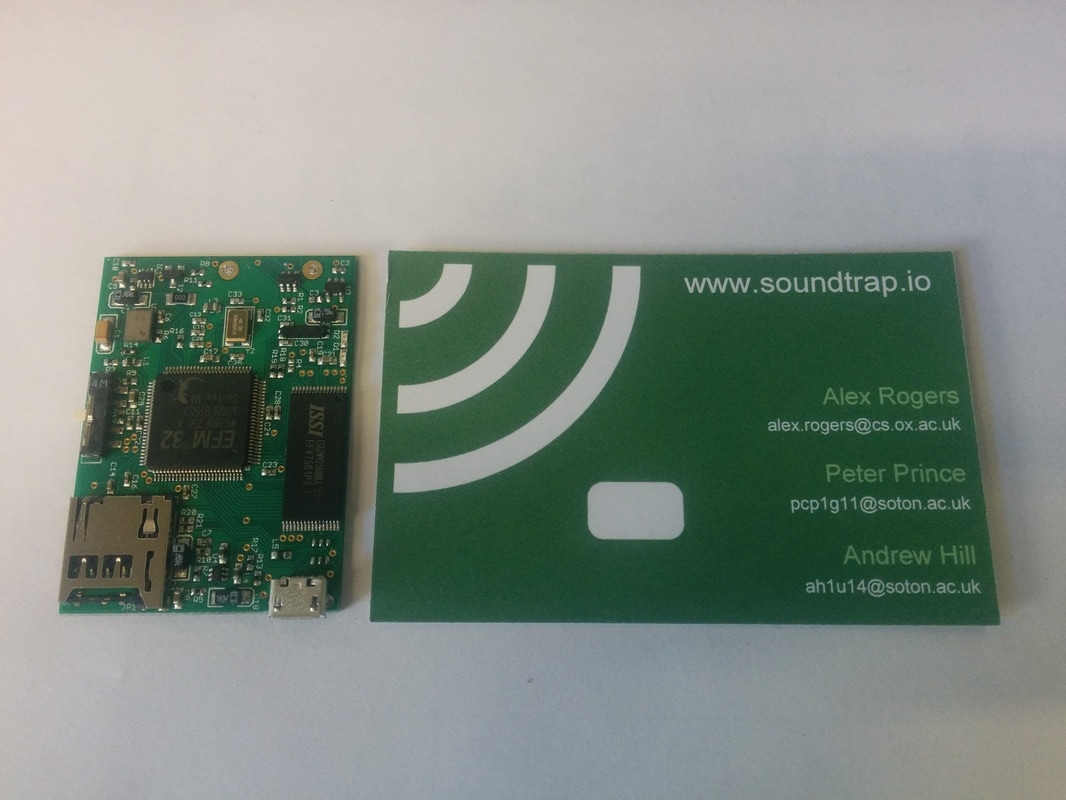 Soundtrap Detector During our weekend testing of the new plane (the Talon, see the blog post here) we were actually able to do some side-by-side comparison testing with the Soundtrap and the Peersonic and we'll be putting up another post about this shortly.
Our plan at the moment is to run both the Soundtrap and the Peersonic concurrently to give us the best chance of capturing some good data. We'd also like to take this opportunity to say thank you to Alex, Peter and Andrew at Soundtrap who have been fantastic! It's been a little while since the original Ultrasound - Part 1 post. At that stage we were looking into different ways to capture the ultrasound that the bats are creating and we mentioned we would be putting up a Part 2 to show which option we went with. We know that our bat detector must be as lightweight and small as possible and fortunately we were contacted a number of months ago by a chap called Peter from a company called Peersonic. Peter and his team are the designers and manufacturers of a fantastic detector called the RPA2. Check it out below: 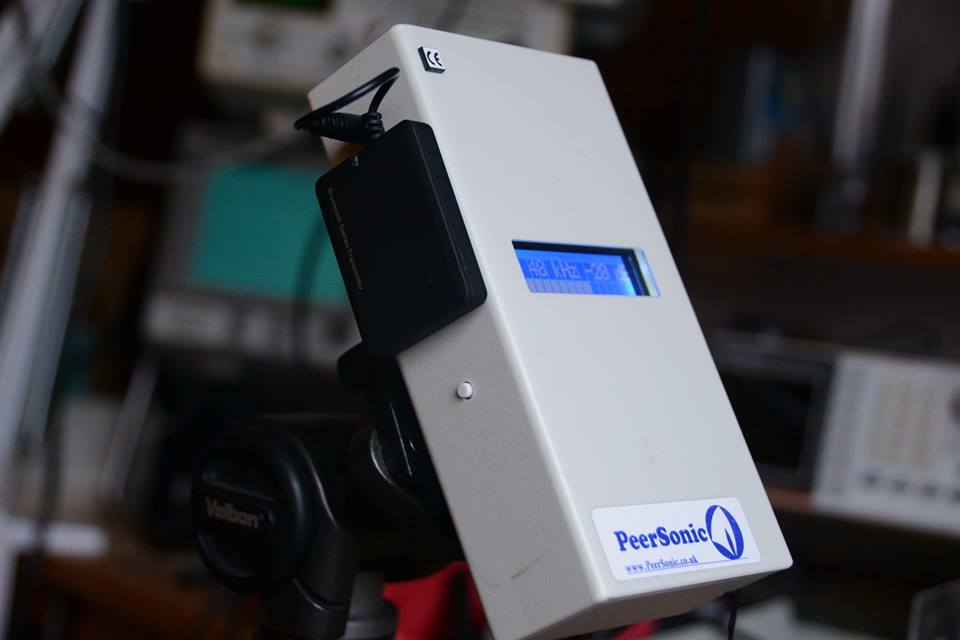 Peersonic RPA 2 Bat Detector The functions that the RPA2 provide are unparalleled at this price point. Add into the equation that we can just use the circuit board, which lives inside the housing in the photo, and you have a very lightweight (circa 100g) and small system which suits us perfectly.
It's worth adding that Peter and his team at Peersonic have been fantastic and are still supporting us in our efforts. Peter has configured a RPA2 to work with a load of batteries we have lying around (1S LiPo) and built us a number of bespoke microphones which discriminate against lower frequencies in order to reduce the engine noise saturating the bat calls. We can't recommend Peersonic enough and if you'd like to check them out for yourself then we would highly recommend visiting their website at peersonic.co.uk. Following on from our post here about our new detector from PeerSonic we went ahead and did some testing with this on the plane. We wanted to ascertain how the plane/detector performed for two criteria:
For a quick reminder, here's the set up we were using as modelled by Tom A: 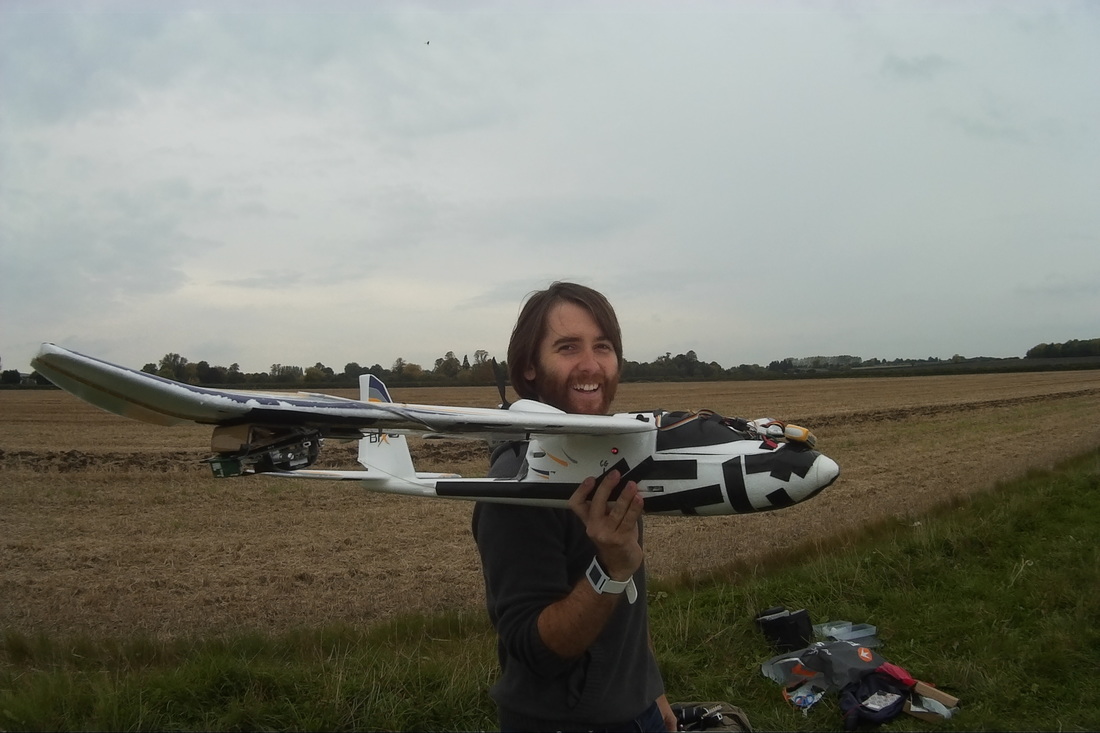 Wing mounted detector set up The position of the detector on the wing tip is not ideal. It leaves the detector open to damage upon landings and adds additional weight at an extreme position relative to the centre of gravity which must be counterbalanced and gives rise to instability. For flight testing, we balanced the weight of the detector with a bag of sugar on the opposite wing. We're currently working with Peter at PeerSonic for a solution to this where we'll hopefully have the microphone separate from the detector and be able to mount the detector more centrally (relative to the centre of gravity for the plane). So, how did it fly? There was a noticeable instability in the roll element of the flight but nothing that the flight controller stabilisation and pilot input couldn't correct. This was more apparent when windy but the plane was definitely flyable in this configuration. For the ultrasound detection testing we flew two passes at roughly 10 m from the detector horizontally and at altitudes of approx 10 m and 20 m. Here are the sonograms from these passes: 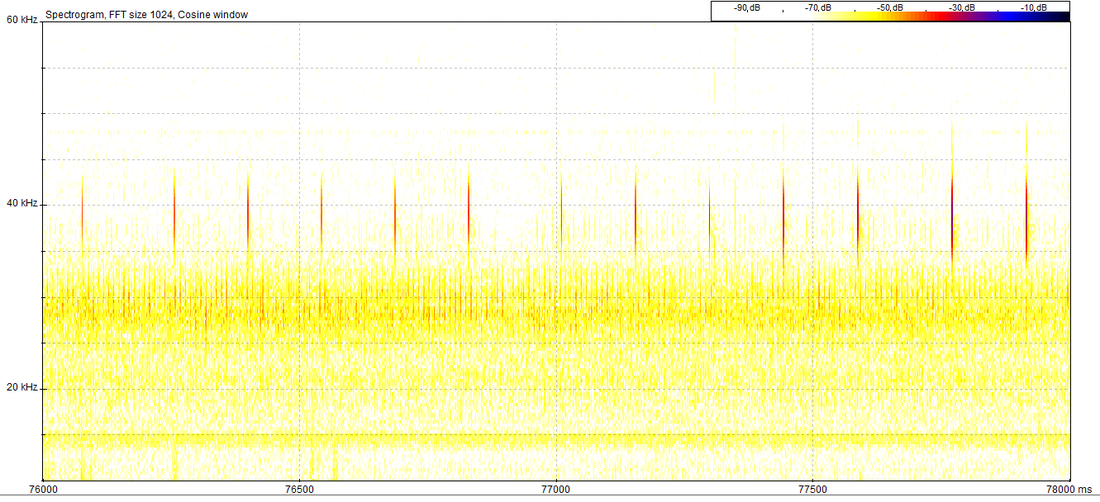  The ultrasound source is easily visible at 10 m, especially as it's a different frequency to the propeller interference. At 20 m we can see that the ultrasound source is hardly detectable.
Fortunately, we expect bats to be somewhat louder than our ultrasound source and hope to be able to detect at 20 m and perhaps even further. So, great news! We now have a working prototype for the Bat UAV! In the next post, we'll be doing some actual field testing and see if we can record any bats! In a bit of a testing lull, we thought it might a good idea to update you on the sort of kit that we're now using as this has changed somewhat from the first post about this here.
We've moved away from the quadcopter for a while now and have been testing a plane instead. This post is about the cost and suppliers of the stuff that we're using in case you would like to have a go at this yourself. So, let's take a look. The first thing to mention is that we're not going to be 'hearing' any bats without a decent detector. As mentioned in our last post about the new detector we've been using a prototype detector from peersonic.co.uk. It's a brilliant bit of kit being much lighter and smaller than anything we've seen on the market. Thanks as always go to Peter at PeerSonic for his help with this. We're also using a Bix3 from hobbyking (this link will take you to the Ready To Fly (RTF) version, we used the Plug aNd Fly (PNF) version but it doesn't seem to be on their website anymore). Something we haven't mentioned before is that we're also using a Spektrum DX8 transmitter. Have a look at our post here for why we went with a plane and this model in particular. Might be easier from this point to use bullet points for the rest of the stuff (all prices include VAT):
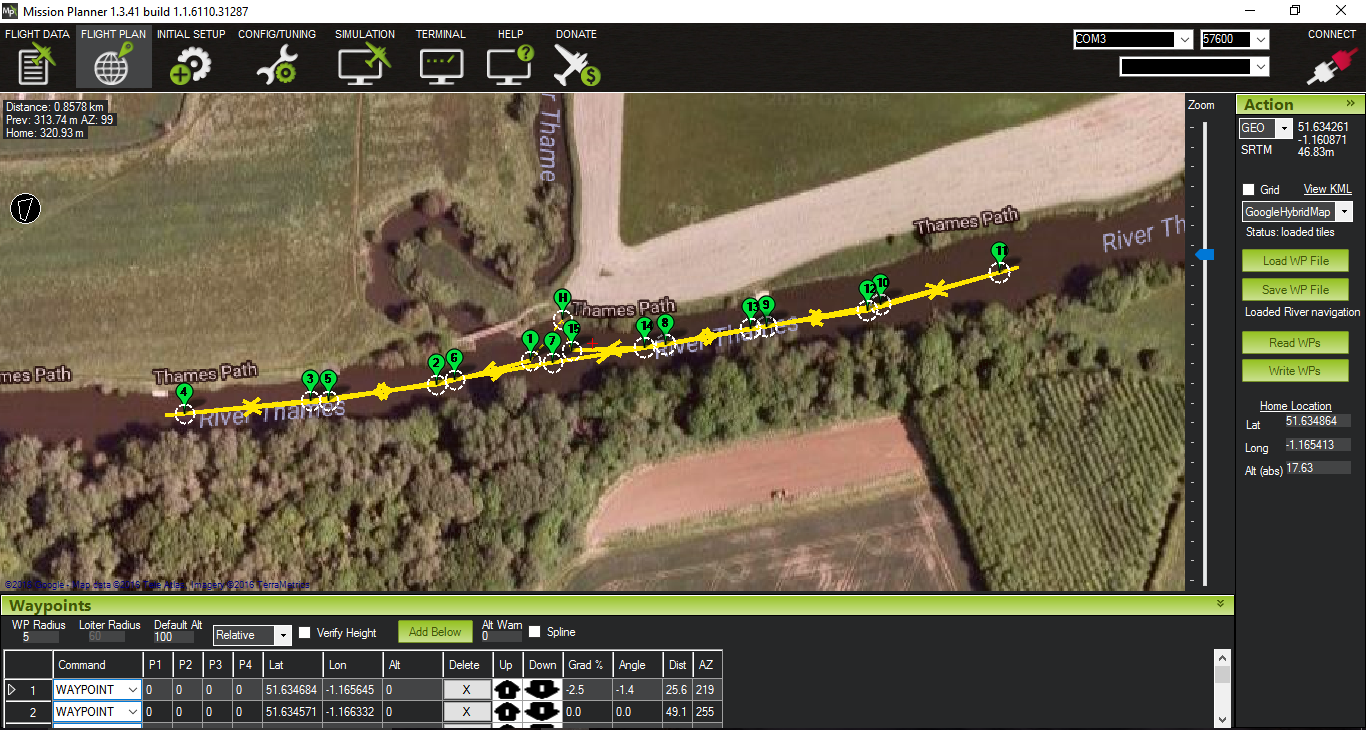
We also use program called Mission Planner to plan our routes on a laptop which we take into the field with us. This is the software that you connect to the Pixhawk with in order to plot waypoints and configure how the plane flies. Have a look here for the firmware we're using on the Pixhawk, it's all open source and free: http://plane.ardupilot.com/ So that just about covers everything that's required to put together something that we hope will have a decent chance of recording bats in flight. We do have future iterations planed design wise for the plane to further distance the motor/propeller and the detector so watch this space for future developments. Next time out in the field we'll be collecting some flight recordings with the detector and hopefully getting close to proof of concept. We've had some success recording an ultrasound source whilst in flight with our current detector set up that can be seen here. Unfortunately, this set up does not enable recording whilst the motor is in use and required the gliding flight that we tested this with (see here). Our ideal solution is a detector that can record whilst in normal level flight and we might just have been sent one such detector! Having posted our blog updates in the UK Bat Workers group on Facebook we had a reply to one of the posts from Peter at peersonic.co.uk. Along with a colleague, Peter has developed a very light and compact detector:
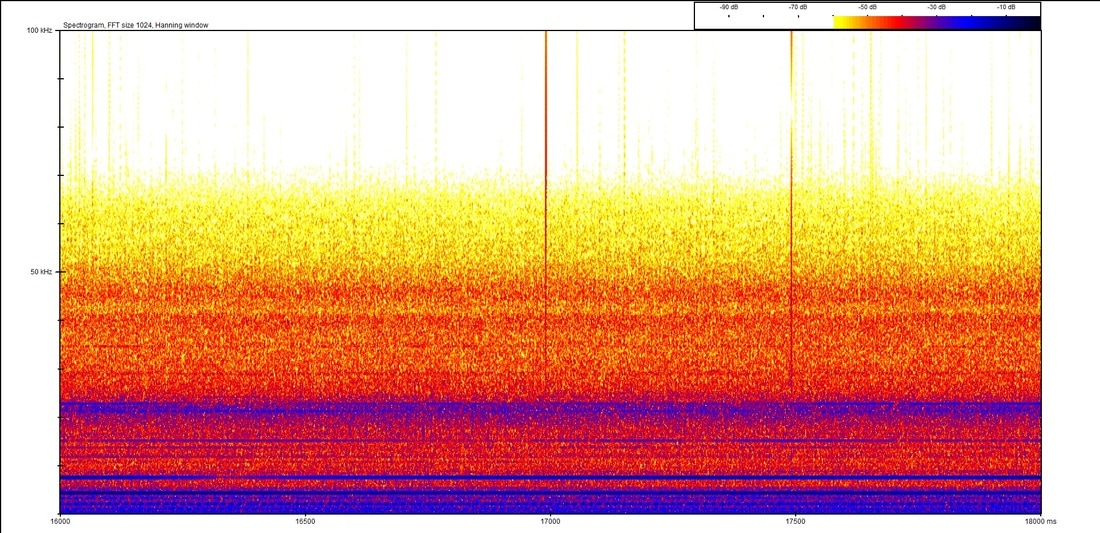
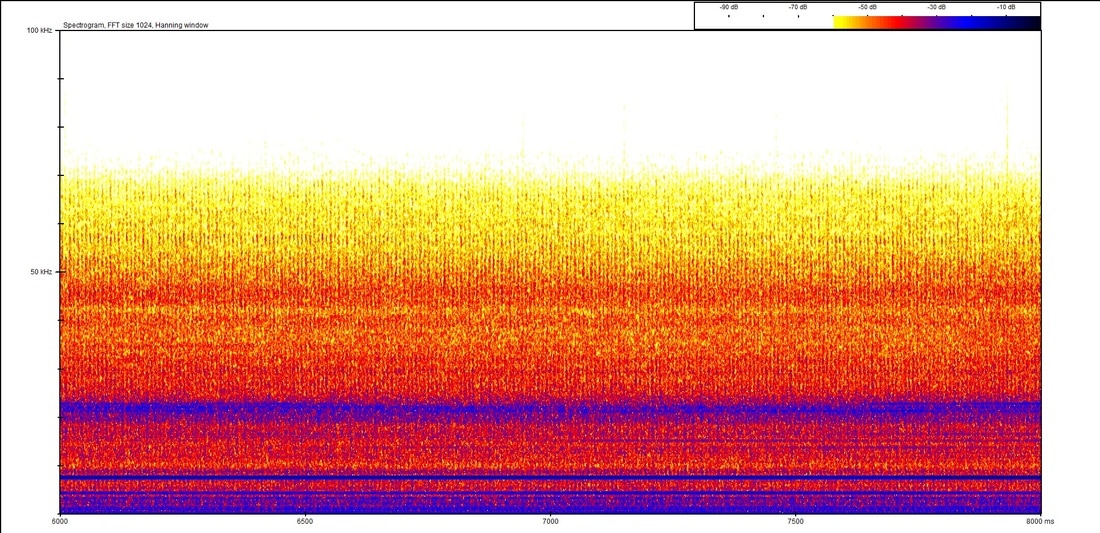
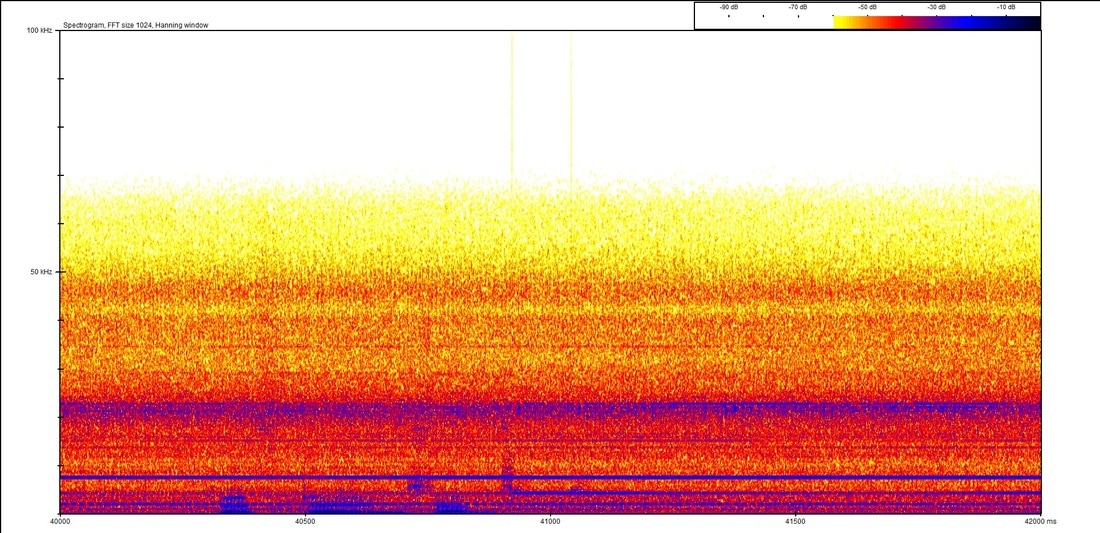
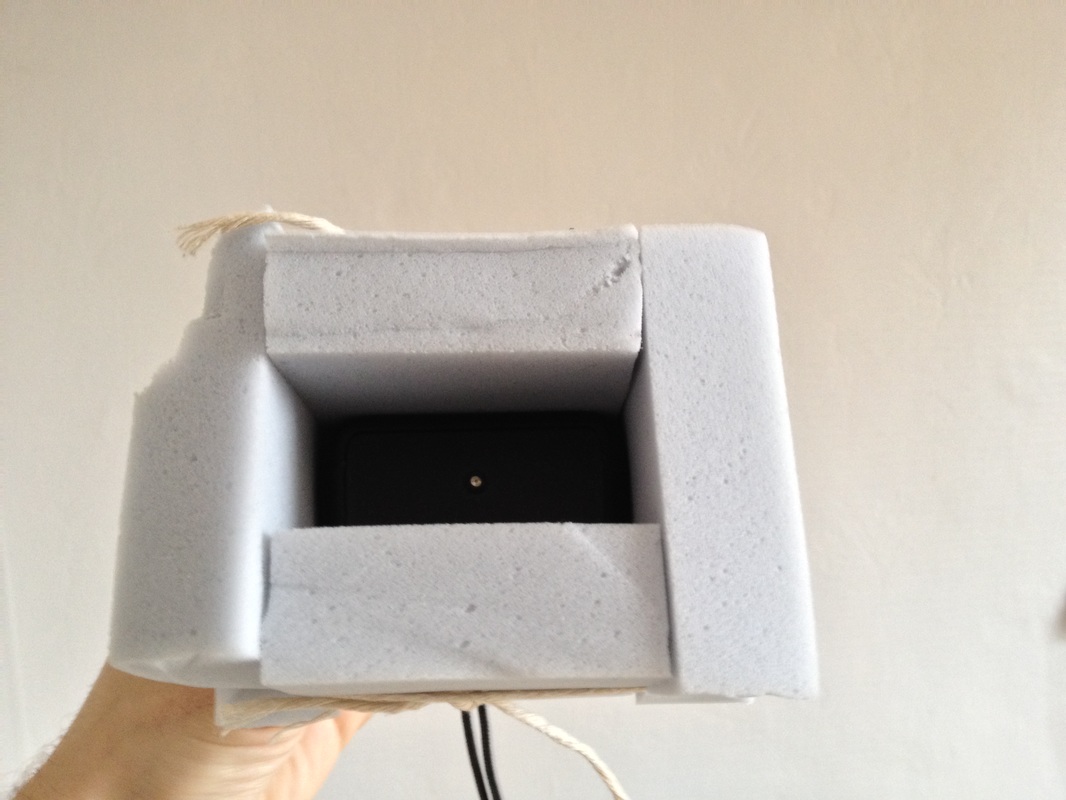
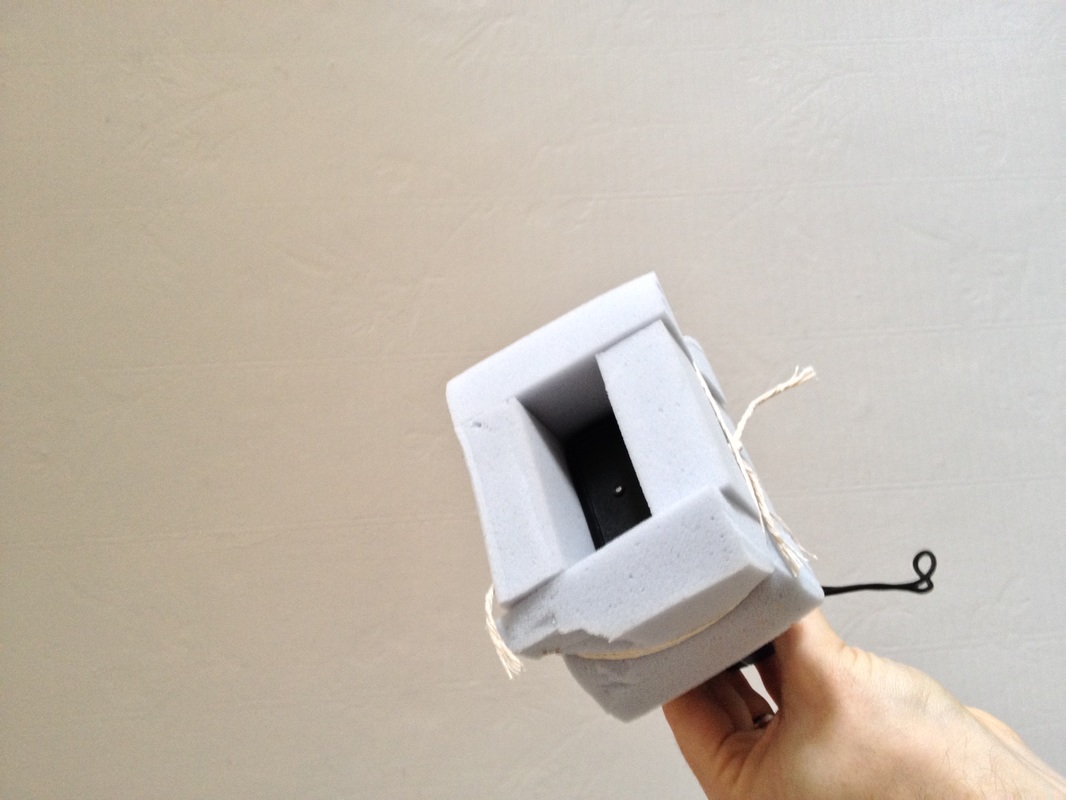
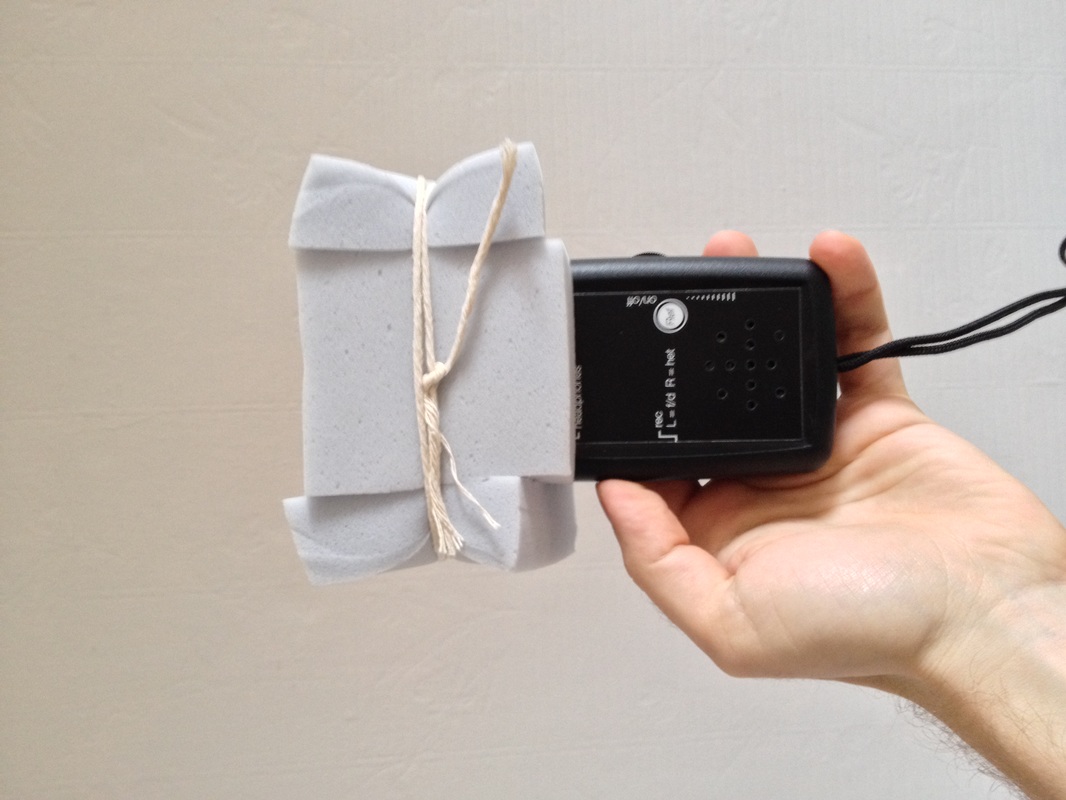
Peter very kindly offered to send us one of his prototypes and we were very happy to accept and give it a go. Having thought about the placement of the detector we decided that if we placed it at the end of the wing we might just be able to get away with detecting the bats over the noise of the motor. We came up with a way of attaching the detector to the plane (though at this point this hasn't been flight tested). The photos below show how we've attached the detector and put a polystyrene protector over it. With our new set up we wanted to test whether an ultrasound source can be detected over the noise from the motor 'in-flight' . To do this we held the plane steady approx 2 m from the ground, set the throttle to circa 40% (which should be roughly level flight) and turned on our ultrasound source at multiples of 2 m from the detector. The analysis of the data was then done in two parts. Firstly, Tom put together our usual graphs using R which produced the graphs below. It's worth noting that all the graphs use a negative decibel scale. 0 dB is the loudest sound detected and everything else is measured relative to this sound. 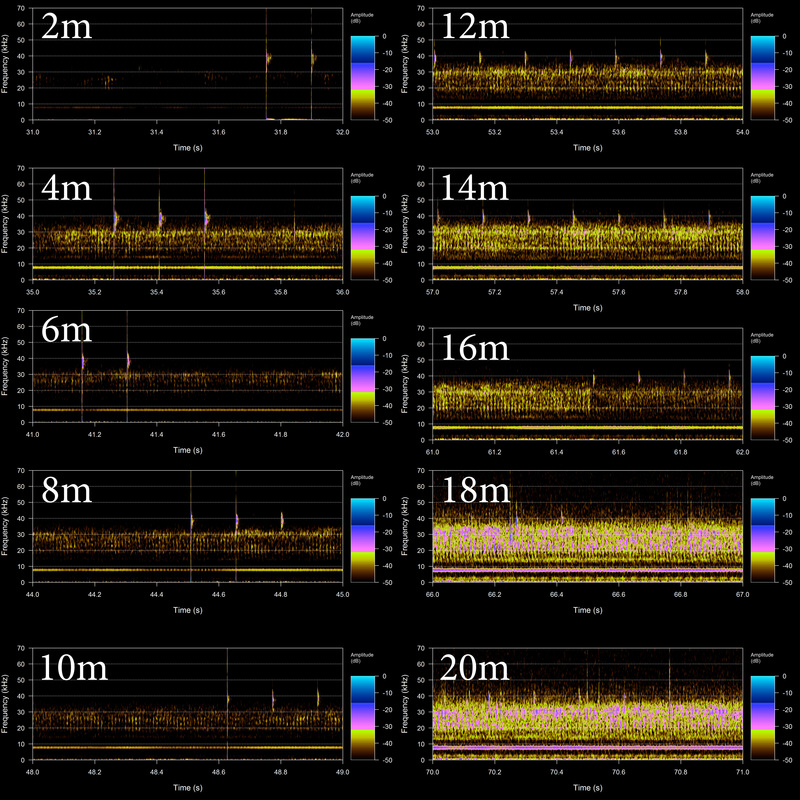 R analysed test data from various distances The blips that show up regularly at about 30-45 kHz are from the ultrasound source. The lower frequency noise between about 20-30 kHz is from the propeller and motor. Using this software it looks like we can detect the ultrasound source up to about 16m. However, when the data was run through BatSound we were able to extract a lot more useful information. Have a look at the graph below which shows the distance at 20m and you can clearly see the blips from the ultrasound source: 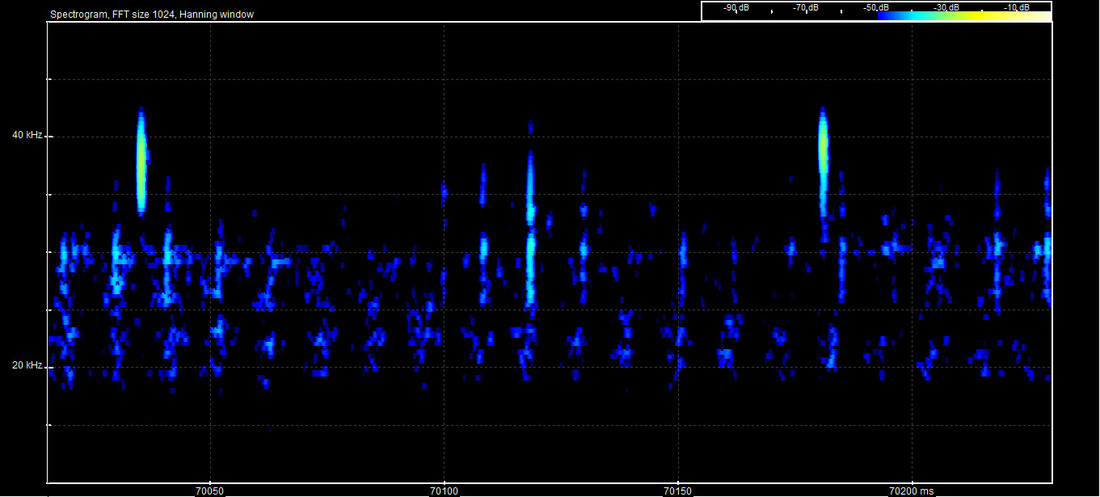 BatSound analysed test data from 20m with the ultrasound source So, we've got some good news: using the BatSound software we're able to detect up at 20 m and potentially a little further. We suspect that bats are going to be somewhat louder than our ultrasound source but would caution that ultrasound attenuates quickly. We'd be very happy if we could still detect at 30 m but we'll have to do some more testing to see whether this is the case.
As an interesting aside the graph above covers about 200 ms, the motor/propeller 'noise' (~20-30 kHz) is now split up into the actual rotations of the propeller. Working through this, we can tell the propeller is rotating at around 3000 rpm. The next test we'd like to perform is a level flight over the ultrasound source at varying heights so watch this space. If we can achieve a recording from this then we'll progress to attempting to record some real-life bats! We'd like to take this opportunity to give a big thanks to Peter at PeerSonic who kindly provided the prototype detector that made this all possible. Thank you! It's all coming together! We have a rig that allows us to attach an ultrasound detector and recorder to a UAV (have a look here on how we did this), and we can use gliding flight to record without interference from the engine. So we gave it a go: Flying the drone around on a loop we used a ultrasound source to produce noises that the on board recorders would pick up. The results are promising. When flying overhead at around 20 meters the detector was able to pick up the ultrasound signals emitted from ground-level. Since bats are often flying at tree height this gives us a good chance of picking them up in flight. 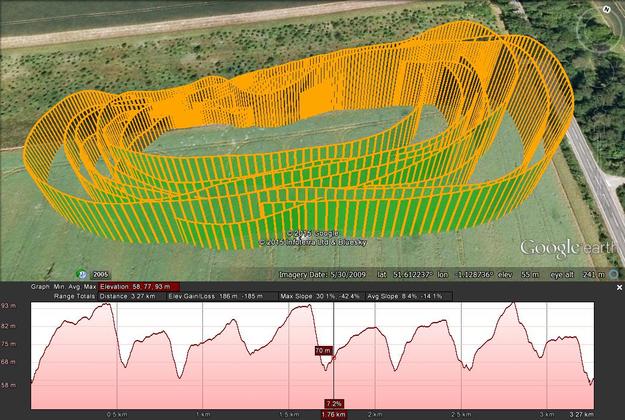 The flight telemetry from our test flight. You can see the gliding sections at the back flying right to left. Below is the elevation profile of the flight. The glide slope we experienced was approximately 3.5:1, meaning that for every 1 meter altitude lost we flew 3.5 meters laterally. This isn't particularly good and the glide slope was reduced by the fact we were flying into the wind whilst gliding. Although this provides additional lift, the reduced ground speed has a large impact on the slope. In future flights we'll fly the glides downwind as much as possible. The next step will be to plan and fly an autopilot mission using the gliding method to try and record an ultrasound source. It's worth noting that we don't think this is the ideal solution and would much prefer to be able to record all the time so we're looking at other options for this. In our previous tests we have shown that ultrasound interference is an issue (here and here) and that suspending the detector away from the engine is difficult (here, here, and here). One way to beat this problem is to turn off the engine and glide. If we take this approach then the detector rig can be mounted on the aircraft directly. A couple of things to consider:
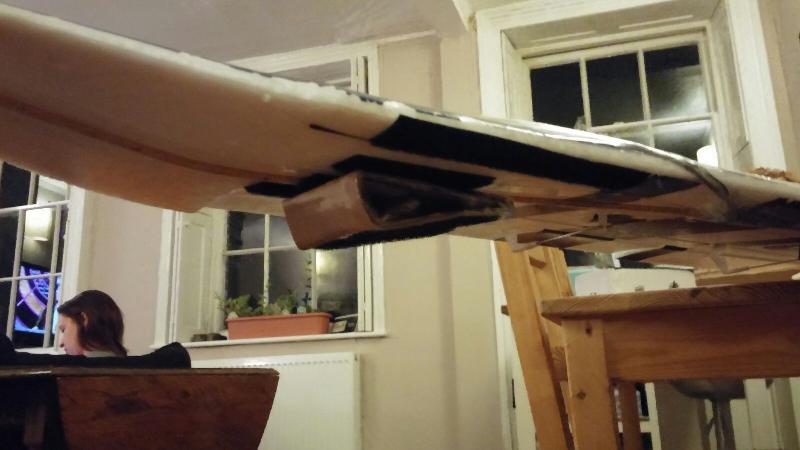
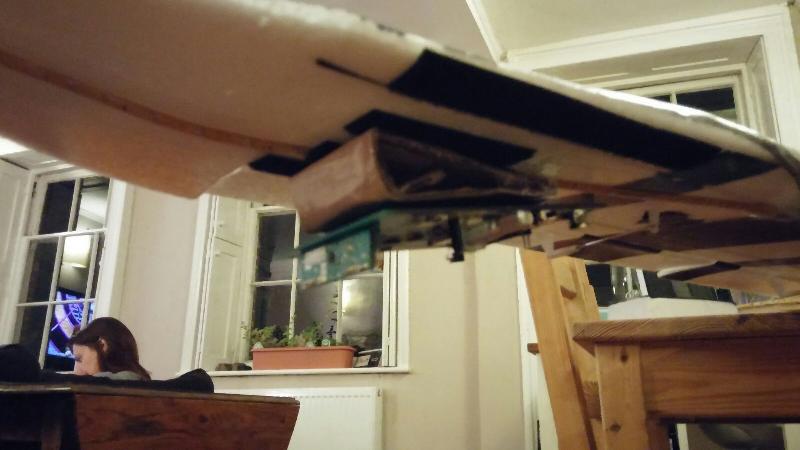
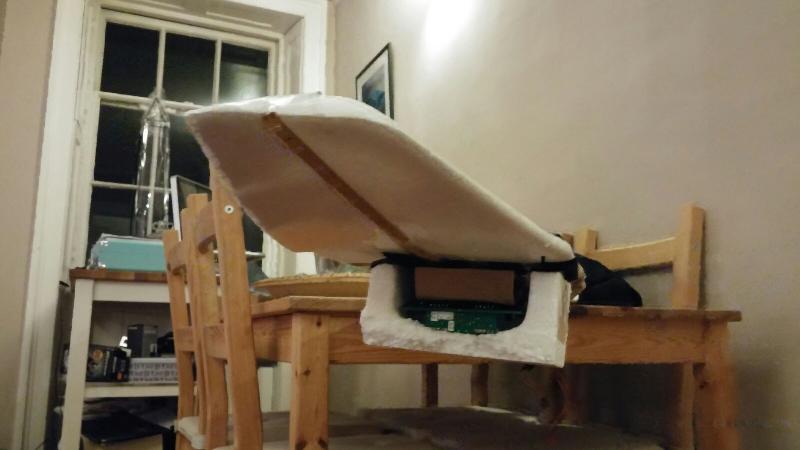
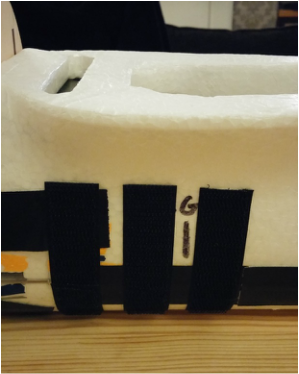
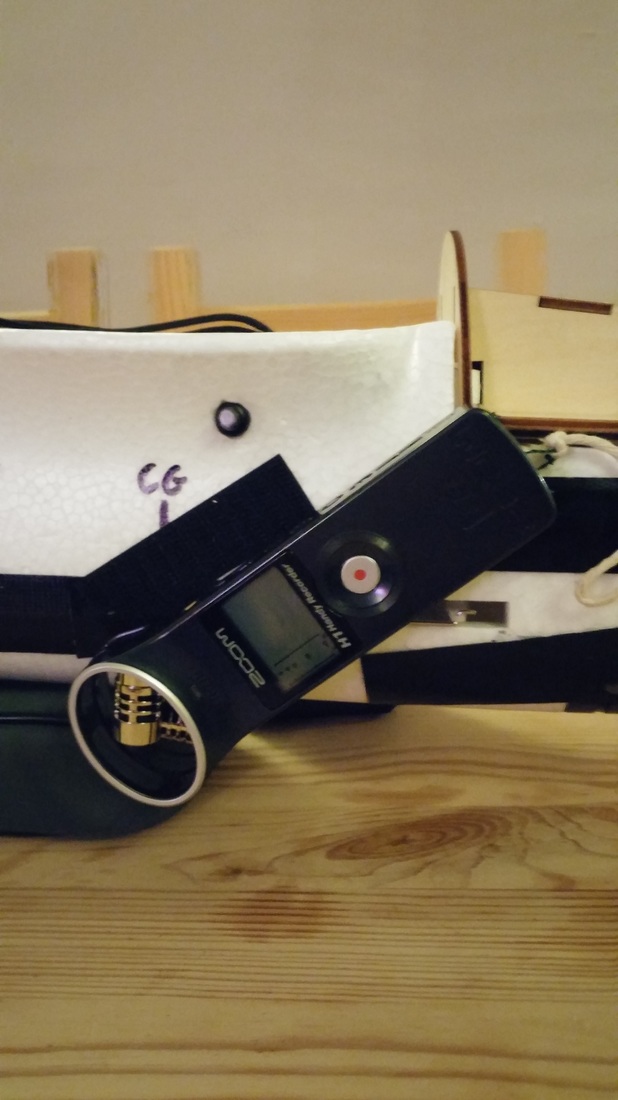
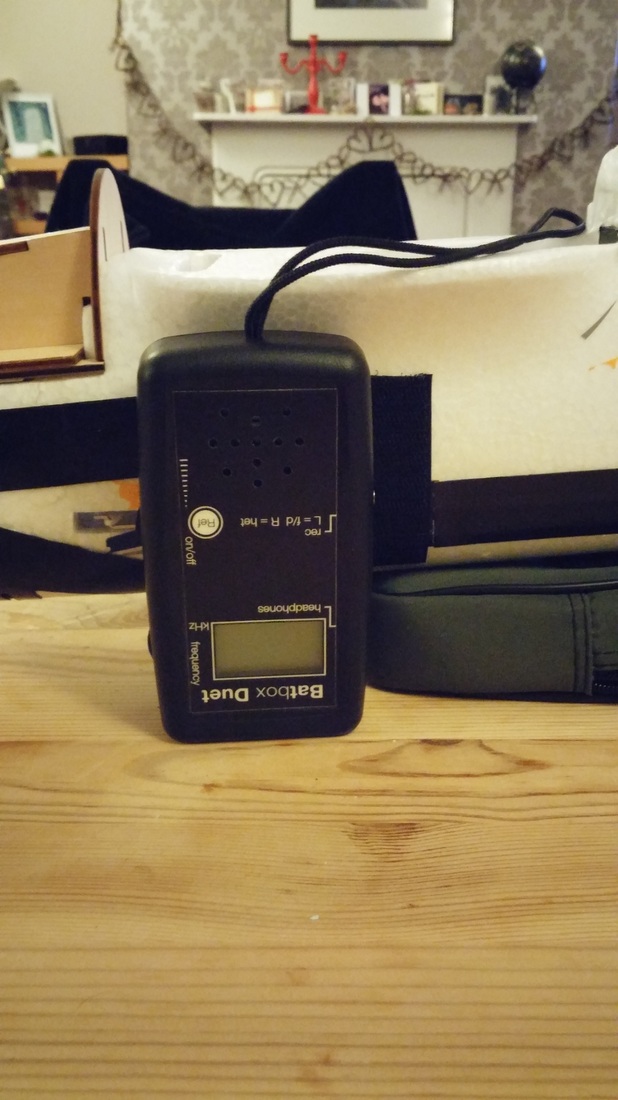
 We then placed Velcro strips on either side of the plane where we are going to attach the detector and recorder, and on the devices. This makes it easy to attach and remove the devices.
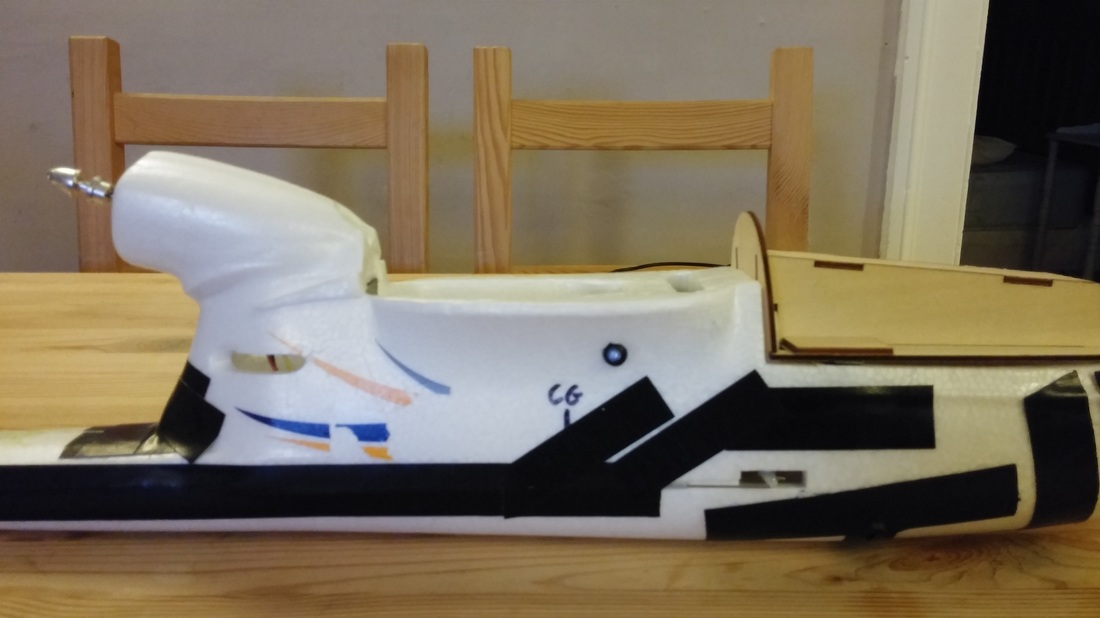
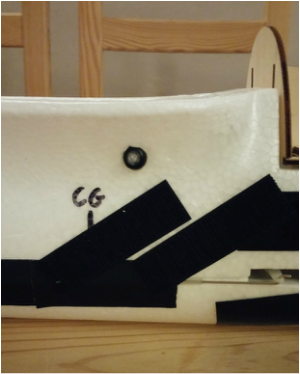
First we found the center of gravity and marked it on the side of the plane 'CG' 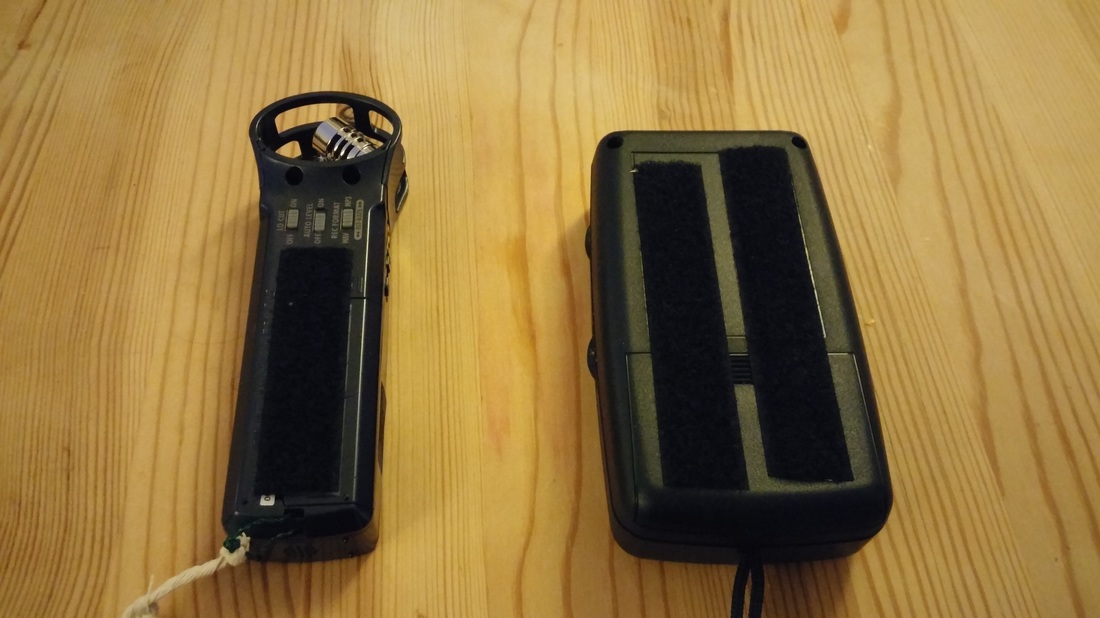 The detector and recorder fitted on really nicely to the Velcro which seemed pretty secure.
To make sure that these don't fall off we put the lanyards around the pins that secured the wings, when the wings are in place this means there is no way they can fall off even if the Velcro fails. 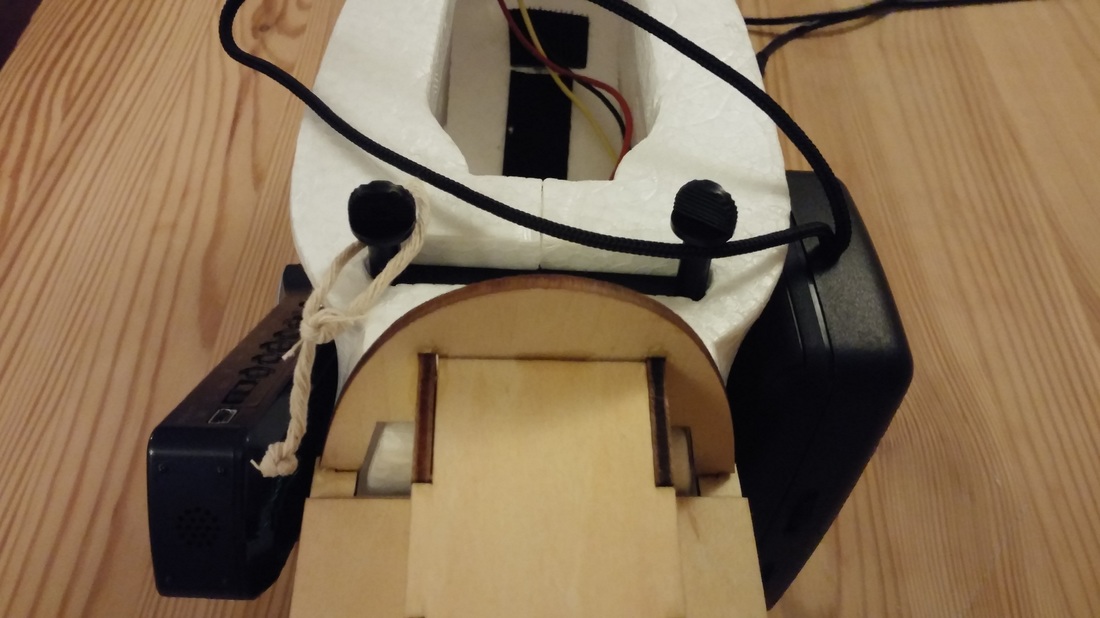 Next up we'll try testing the rig in flight and seeing if we can record some ultrasound!
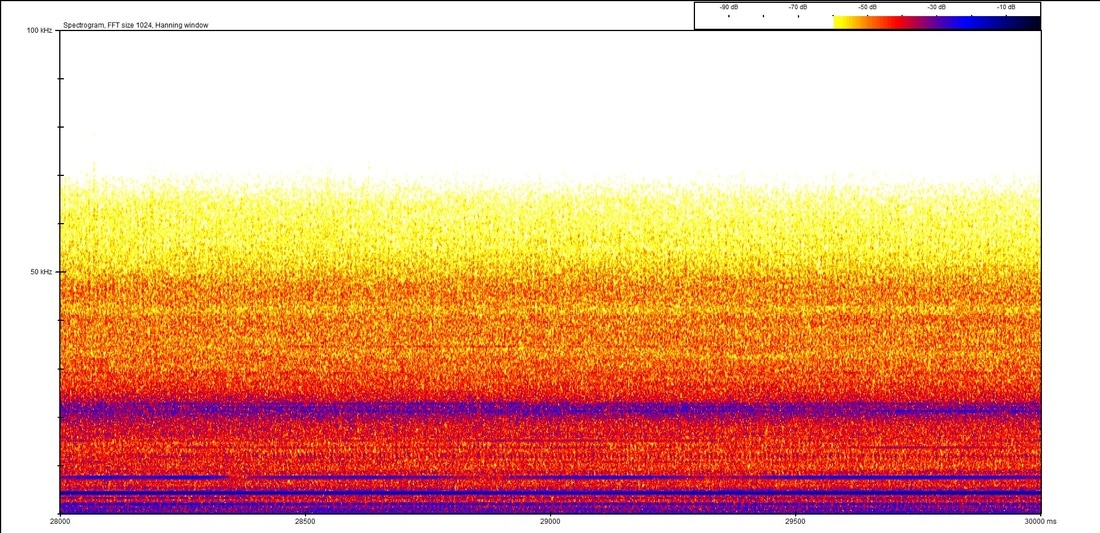
When we tested the quadcopter we found it produced a lot of ultrasound interference. This time we tested our new plane (Bix-3, Hobby King) to see how it compared. We had three different propellers to test, and we also tried out some acoustic foam to try and dampened the noise from the engine. In the graph you can see each of the propellors types across the top and the results with and without foam along the side. The three lines in each panel show three distances from the nose of the plane, 0cm, 50cm, and 100cm, the top line being the closest (0cm). 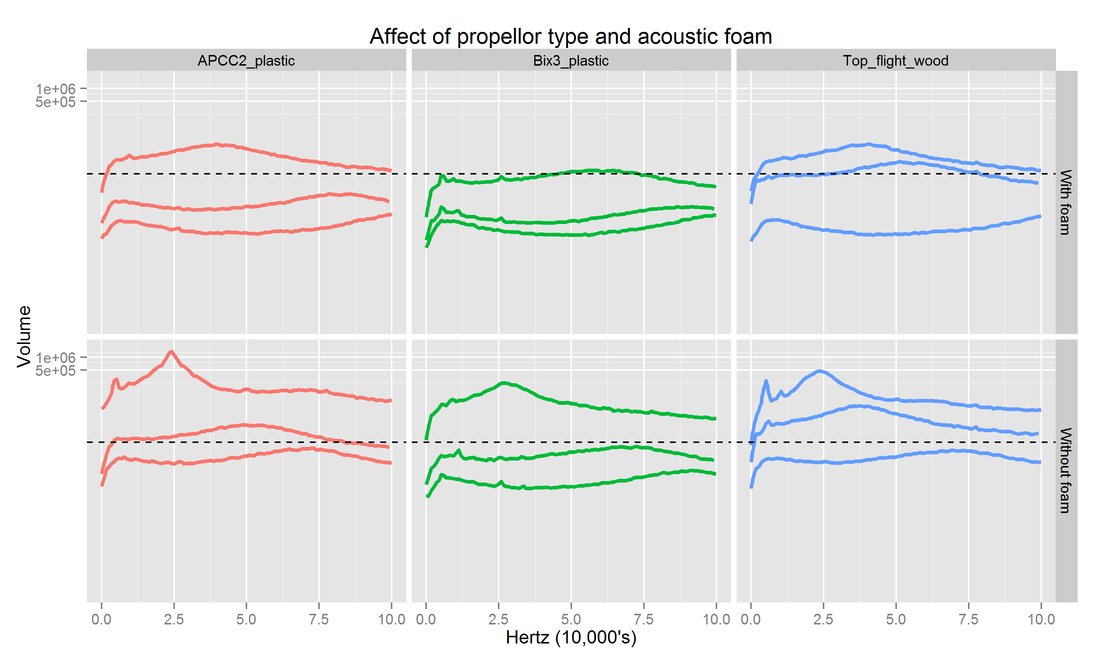 You can clearly see that across the three propeller types the foam makes a big difference to the volume of interference (note that y-axis has a log scale). All the top panels (with foam) have a lower amount of interference than the paired bottom panels (without foam). When we compare across the propeller types the Bix3 clearly outperforms the others, and the volume levels at 50cm with foam is similar to that at 300cm with the quadcopter, a great improvement.
|
Categories
All
Archives
March 2017
|


 RSS Feed
